Showing posts with label Drafting. Show all posts

Sunday, 23 June 2013

Denim Cambie Skirt

Its funny how inspiration hits you sometimes, I’m not 100% sure where this came from, it could be that I had such a great time making my recent Cambie dress and think it was a great success, it was probably seeing the great denim skirt that  Kathryn @ YesILikeThat  made and also wanting to try something new that made me produce this!

WP_20130623_047

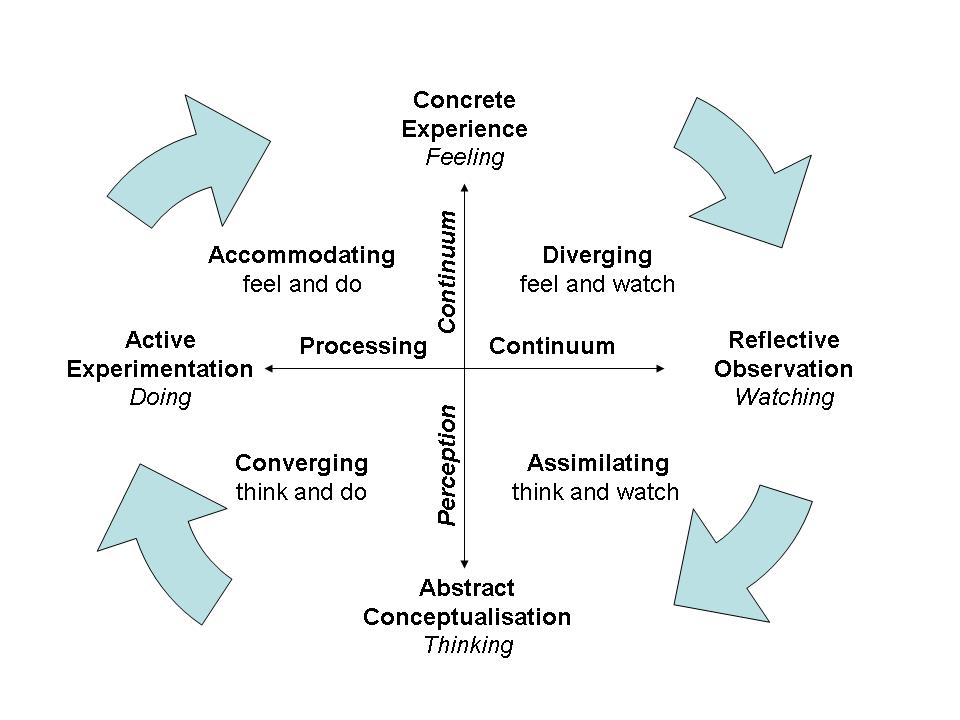
I decided I had to have would be quite partial to a great denim skirt, something that I could wear to death, boots and tights in winter, sneakers and ballet flats in summer.  So I ordered some 8oz Washed Denim Dark Blue and gold denim topstitching thread from Minerva Crafts (which btw, I love, they are my go-to fabric shop atm) and then started thinking.  You might have realised this by now dear reader I’m very much a procrastinator and like to ponder and think about things before I try them out (we were learning about different Learning Styles in college and discussing Kolbs Learning Model and I’m most defiantly a Reflective learner rather than a Active learner, the very thought of jumping in and trying something brand new without thinking and researching makes me break out into a cold sweat!).  So I looked in books, I emailed Kathryn, I drew pictures and made notes and thought about it for a while.  My original plan was to use the skirt block I made a couple of years ago from Cal Patch’s Design-It-Yourself Clothes book so I got that out and looked at the styles she described as I remembered she had a felled seamed skirt in there and realised I could use the skirt section from the Cambie Pattern as it had the basic shape I was looking for, it had pockets, even if they are straight slash pockets rather than the scoop-style pocket I was envisioning, I thought it would save a LOT of time.  

One change I did make was to use lining fabric for the pocket bag, this meant cutting the pocket piece to have a 2” facing which then attached to the lining and was invisible from the outside. I also made the pocket 2.5” larger by cutting through the fold line and extending by measuring my hand on paper. 

WP_20130623_035

I used the pattern waistband except I cut it so that it was in three pieces and I could adjust the fit at the side seams (in the end I don’t think I did adjust it much).  I used some fabric that’s been in my stash for a long time left over from another project for the waistband lining and interfaced it. 

WP_20130623_032


I sewed 2 lines of topstitching on the pocket edge to finish them off as well as giving them strength.

WP_20130623_018

Instead of cutting the front of the skirt on the fold I cut two pieces so I could do a flat-felled seam using the gold topstitching thread and denim needle. 

WP_20130623_017

I sewed the side seams and the pockets together using regular thread and then serged the edges to stop fraying. 

WP_20130623_033

I attached the waistband and then thought some more about the centre back seam.  I wanted a flat felled seam look with a zip inserted into the seam, originally I wanted a lapped zip but despite searching the WHOLE internet I couldn’t find any examples.  Kathryn was kind enough to send me a photo of the back of her skirt which was really helpful.  I then experimented with some scraps of denim and the zip to see how I could put the zip in, top stitch it and make it look like a felled seam. 

WP_002349   WP_002356

In the end I sewed the seam with a regular seam using regular thread, basting the top zip section.  I then pressed the seam open, trimmed the seam allowance down and folded over to make a faux-felled seam this meant cutting into the seam allowance just below the zip.   I unpicked the basted section and adjusted the seam allowance to make a small lapped section.  I topstitched the right line of thread first running all the way from the waist down to the hem on the left hand skirt piece, then I attached the zip to the right hand side. 

WP_002366

Here you can see the zip pinned in place and the first line of the faux felled seam sewn.  The zip was sewn in place on the right using regular thread and then the second line of topstitching was sewn to sew the zip in place and complete the faux felled seam. 

WP_20130623_019

I’m really quite pleased with the way it came out, I wouldn’t mind if the zip was lapped a little more but on the machine I was using that wasn’t  much leeway as I would have liked with the zipper foot I had.  My other machine has a better zipper foot so that might work better in future. 

WP_20130623_040

Inside view of the zip where you can see how I trimmed the seam allowance to allow a faux felled seam and zip insertion!

WP_20130623_025

Here the completed zip + faux-felled centre back seam.

Once the zip was done the rest was easy! I used my chalk hem marker to mark the hem, basted that line, pressed it up to double check and then did a simple hem topstitched about 3/8” from the hem edge. 

WP_20130623_013

I stumbled upon this You tube video in my many hours of research on sewing hems and liked the tip mentioned at 4:08 about hemming over the felled seam and how to use something to support the foot over the contours.  I didn’t have a nice tool so I improvised and used my point turner to prop the foot up and as you can see above it worked pretty nicely. 

WP_20130623_004

I hand-sewed the waistband down using a cross between blind hem stitch (I only took a couple of threads of the denim) and a ladder stitch (I sewed along the fold of the red lining fabric to pop out further along), I’m not sure what the technical name of the stitch is but it works and is invisible both sides!

WP_20130623_031

I overlapped the waistband and sewed on a hook and catch thingy, I actually sewed this on 3 times as the first time it was the wrong way round and the second time there wasn’t enough tension between the two parts and it kept falling open!

WP_20130623_045

Bad hand stitching but at least I matched the thread!


WP_20130623_038

Inside views

WP_20130623_026


WP_20130623_053

bum shot!

I really enjoyed making this skirt, it was a real challenge and a personal design, I decided what I wanted and did it without worrying about going off-piste with the pattern, directions etc.  At the end of the day its just a denim skirt but I feel its a well-executed denim skirt, which went together really well, I only unpicked 1 line of top-stitching and that was because it was too narrow rather than wonky! Just as well really as there's not a lot left, tip #562 buy 2 reels of topstitching thread if you feel it might not go well, there's not a lot of thread on them!  The only other complication I had was that I kept changing thread and the stitch settings from regular to topstitch all the time depending on which seam I was sewing.  As I mentioned I have 2 machines so in future I would thread them both one with regular and one with top stitch and switch back and forth.  Did I say ‘In Future’?  Yes I’m already thinking I want a khaki twill safari kinda skirt next, maybe not with the Cambie pattern though, I might go back to my drafted less-A-Line-than–a-Cambie-A-Line pattern and adjust from there.  First of all I need to source some khaki twill, 10 points if anyone can suggest a good place to get some….

Monday, 31 December 2012

2012

Review time!  Well I majorly failed in achieving what I set out to do at the beginning of the year!  I was going to make a dress every month of the year to increase my sewing skills and to increase my wardrobe! Well that didn’t work! For the first few months it went well I made 4 dresses and a cheating dress for Miss C all of which I’ve worn regularly over the year.

DSCN8890DSCN9148WP_000373

120530-1109056791930328_5ef8381a3b_o

But then deadline was getting to me, I was making Simplicity 2588 in a lovely navy gingham and it just turned into a disaster when I got the the collar stage.  I’d even made a muslin of this dress which looked good and I had high hopes.  I spent ages making sure that the gingham squares would line up but I think I put the collar piece on the wrong way round and by the time I realised I’d trimmed the pieces and broken my heart!  Its all in a bag, maybe I’ll revisit next year…

WP_000823

So I decided to stop pressuring myself and take a break.  From then on the rest of the year was great, I sewed what and when I wanted, I even got into hand sewing and hand quilted a quilt.I found it relaxing and enjoyable to sit there in the evening sewing away.  This was why I at the end of the year I finally had some success with crocheting. 

WP_000328editednamefrontbrightenedWP_000860WP_002037WP_20121215_025

My best successes this year were designing and drafting a costume for Miss M and making my Stripy Renfrew top although the kids LOVE the quilt!

WP_20121204_004WP_20121222_014

I enjoyed the process of making a sloper/block for Miss M and the freedom to design whatever we wanted.  It made me go back to my long dreamed of ideal of having a basic block for me and adapting it.  I’m not going to set myself the challenge of doing this as from past experience I’ve found it doesn’t work, plus since last year I’ve now got 2 jobs and doing a Teaching Assistant course which tons of homework each week!  Hopefully I will be getting more work next year so I’m not going to put any more pressure on myself, but I would like to draft out a basic bodice and go from there instead of buying the same type of dress all the time and making similar adjustments all the time.  I’d also like to make more Renfrews as they are just great and perfect for work in school so I’m on the look out for lovely knits.  I’d like to try more crochet but not sure what yet, it was great to have a target and theme of Christmas for the bits I made but not sure what to do in 2013.  BTW this blog is now 3 years old!

Tuesday, 11 December 2012

Tudor Lady In Waiting

Miss M has been studying the Tudor period in school and this week they had a dress up day where the whole year group coming in wearing Tudor costume.  This by coincidence happened to fall on Miss Cs birthday so I knew that as we were having her party on the weekend the dress I would have to make wouldn’t happen then and I needed to get a head start on it.  So back in half term I got the ball rolling.  Using the fabulous drafting series that Lorraine made a couple of years ago, I endeavoured to make Miss M a sloper/block.  It took a number of iterations before I got something I was completely happy with…

WP_001849

WP_001851

WP_001852

(could do with a little more swayback adjustment)

WP_001853

WP_001855

(finished article with lots of bit of paper stuck back on!)


Making a sloper/block (I’m never sure which word is correct, does it just depend where you come from or is there an actual difference between the two?) was great fun and really answered my own question about what I should do about sewing although it was a lot easier fitting someone else rather than myself.  So much so I’ve asked Santa if he can arrange a sewing session(s) with someone to make my own sloper/block! 

So once we had a base we looked around at Tudor clothing and discussed what it should look like, Miss M wanted it red, she wanted a square neckline, she wanted a long skirt.  Pouring over Lorraine's resources we liked the principle of her Renaissance Dresses

(source)

and also the dress on the right

(source)

so between these two sources of inspiration we can up with a pattern made from newspaper!

WP_001915

which produced…

WP_20121204_001

WP_20121204_006

I found a curtain offcut for the cream brocade inset for £2 and amazingly I found some trim which matched that offcut perfectly!  The red crushed velvet cost a fortune for a costume but hey, you win some you lose some!

I enjoyed the designing and drafting aspect of this project and I enjoyed sewing it until it got to putting the whole thing together and then the velvet became a bit unstable so a pain in the backside.  I did a handpicked zip and also hand sewed the trim on by hand as I knew it would never look neat if I sewed it on the machine, as it is there's a bump on the zip at the back but to be honest I’m probably the only one bothered about that, as usual all I can think about and see are the negative niggly bits of a project that didn’t work completely perfectly! But for a 1 day costume for school it works, now its been put away ready for Miss C in 3 years time when she will be studying the same subject, as I always say “If they can recycle the curriculum I can recycle the costume!”

Tuesday, 23 October 2012

Advice needed

I've been having a bit of a bad run with dressmaking lately, allsorts of problems but mainly around fitting.  I am pear shaped with rounded shoulders and a High Rounded Back (Don’t want to use the Dowager Hump description!!) so I always seem to have to modify patterns a lot and I don’t feel I’m doing it properly and every pattern seems a uphill battle.  Of course Sewaholic patterns aren’t so bad as Tasia is designing for me…

…but the Big 4 are giving me problems and I get very disheartened.  So I came to a conclusion yesterday that I need to find the ultimate solutions to all my problems, specifically the HRB/DH.  I’ve found lots of resources with lots of possible solutions to the problem, ranging from shoulder darts, to a kinda FBA on the back to moving shoulder seams to easing the fullness into the seams.  My first thought was that I would get a pattern that doesn’t work for me and try each method out and see what works the best.  Once I have the best solution I could apply that to any new pattern.  Then I got to thinking, how about I drafted my own bodice pattern?  Surely that would immediately cater for my lumps and bumps as I would have measured around them and dealt with them.  Once I had that bodice pattern I wouldn’t need to buy Big 4 patterns as most of my patterns are the same, Fit N’ Flare dresses so in theory I could use my ultimate bodice pattern, adapt the neckline (scoop, boat-neck, jewel, sweetheart, peter pan), add sleeves (cap, short, 3/4 length, full) and a skirt, (circle, a-line, full gathered etc.). 

image

I’m fairly conventional in my likes and dislikes and I seem to keep buying similar patterns and I don’t mind wearing the same dress pattern over and over again IF it works for me so why not spend my time building and reusing a block/sloper?  Although I don’t have a huge amount of experience in drafting there are loads of resources out there I could use. 

So what do you think, neither solution is quick n easy, they both require time, commitment and measurements but I can’t decide which to do

  1. Find my optimum adjustments and apply them to commercial patterns as I need to?
  2. Draft my ultimate bodice and use that to design  my own dresses/tops

I think I’m veering towards option 2 as that's always been my long-term goal but I’m just not sure if its something I could accomplish?  What do you think, 1 or 2?

Wednesday, 19 January 2011

Slummy to Yummy?

I’ve been writing this blog for a year now and in that time I’ve made some clothes that I’m quite proud of and have worn a fair bit but when I look at the clothes in my wardrobe and drawers I’m thoroughly uninspired.  I’ve never had what I would consider a ‘style’ I’m usually found in jeans and t-shirt and now I’m in my late 30s I feel its all wrong.  Don’t get me wrong I’m not wanting to reach for the polyester slacks from M&S just yet but I’m fed up of looking like a Slummy Mummy and I want to be more Yummy Mummy!   Where I really want to be is to have a capsule wardrobe based on some really great drafted patterns that I know SUIT me and FIT me so that I can go fabric shopping, see a fabric, think that will look great made into such and such dress, know how much fabric to buy and know that I have a reliable pattern at home waiting to turn this fabric loveliness into  my next favourite garment. 

So how do I go about doing this?  I guess the biggest consideration is the right style for me, I’m most defiantly pear-shaped with large thighs, saddlebags and a wobbly tummy (alright I’m working on it but it takes a while, geez!) and ok boobs.  The rules for me seem to be

  • Fitted top half
  • Empire waistline
  • Princess Line cut
  • A-line skirts
  • Flared Skirts
  • Wrap Dresses and Tops
  • Jackets and tops should end at the hipline
  • Avoid pleats and front zips on tummy
  • No gathering on the waist
  • No bias cut dresses or skirts
  • Frilled hem on skirts (Yuk!)
  • Slash-neck/Sweetheart/v-necks/boat neck/cowl necklines to widen the shoulder to balance hips
  • Puffed/Gathered/Ruched/Fluted/Flared sleeves to draw the eye upwards
  • Dark colours at the bottom, light colours at the top (exact opposite of what I’m wearing today, no wonder I don’t feel like I look good!)
  • Nothing above the knee
  • Dark wide legged trousers
  • Bootleg trousers/jeans with minimal decoration on the butt
  • Longer length trousers
  • Wear Heels as much as possible (probably my biggest problem, I not a big shoe fan and heels defiantly not.  I’m usually found in flat shoes and when I do buy nice clothes I find I haven’t got the shoes to go with it!  Something major to work on….)

Sources (BBC, Shape Your Style, Women's Republic, Suite 101, Life tips, You Look Fab


Well I guess I need a list (love lists, I’m so Type A!) of what patterns I need and then work on drafting those patterns.  I got loads of sewing books for Christmas so really I have no excuse but my own procrastination!  I’ve also been browsing the Boden catalogue, which is always a source of inspiration to me, in fact it was looking at the lovely fabrics and the prices in there that made me start to sew clothes anyway. 

  • Shirt pattern (can be easily adapted for seasons and styles, fitted, loose, long sleeved, short sleeved etc.)
  • Tunic pattern? (not sure about this one, often think I will look pregnant in most tunics on the high street atm)
  • Dress pattern
    • Wrap Dress (Everyone says for my pear shaped body types this is the best shape, I’m not convinced myself as they always seem to be made of clingy jersey which drapes on my wobbly bits in the wrong way)
    • Cotton summer dress (have one in my wardrobe I can copy and use Rivera Dress as inspiration!!)
  • Skirt Pattern (already have an reliable a-line skirt pattern, what else do I need?  Circle? )

So what's my plan? Well I think I should start with shirts.  I think I can smarten up my appearance quickly and easily by making some shirts that I can wear with my existing jeans & flat shoes.  A few months ago I started using Cal Patch’s Design-It-Yourself Clothes to draft a shirt pattern but when it came to making it up the armholes were very wrong.  It all got put aside and no more progress was made on it.  So I shall get it out again and see if I can get to the bottom of the problem, I might scrap it and start again! 

Favourite Shirt – Boden

So what about you?  Are you happy with your style and your wardrobe, what changes would you like to make, what clothes would you like to see in your wardrobe?

Sunday, 8 August 2010

Skirts

Using my tried and trusted self-drafted a-line skirt pattern I made myself a new skirt the other day.  I got some black linen/polyester blend and made my usual skirt with french seams, concealed zip and blind hem. 


I also used bias binding on the waistband, previously when I've done this I've just sewn the binding on but this time I used the crease and stiched in the ditch on the other side. 


I think I've done quite a good job

I also went back to the first skirt I drafted where I had made a very basic waistband and sewn onto the skirt.  Unfortunately this made for a very unflattering and uncomfortable waistband so I took it off and replaced it with bias binding instead.  It makes a much neater, more comfortable and pleasing waistband. 


signature