Showing posts with label a-line skirt. Show all posts

Sunday, 23 June 2013

Denim Cambie Skirt

Its funny how inspiration hits you sometimes, I’m not 100% sure where this came from, it could be that I had such a great time making my recent Cambie dress and think it was a great success, it was probably seeing the great denim skirt that  Kathryn @ YesILikeThat  made and also wanting to try something new that made me produce this!

WP_20130623_047

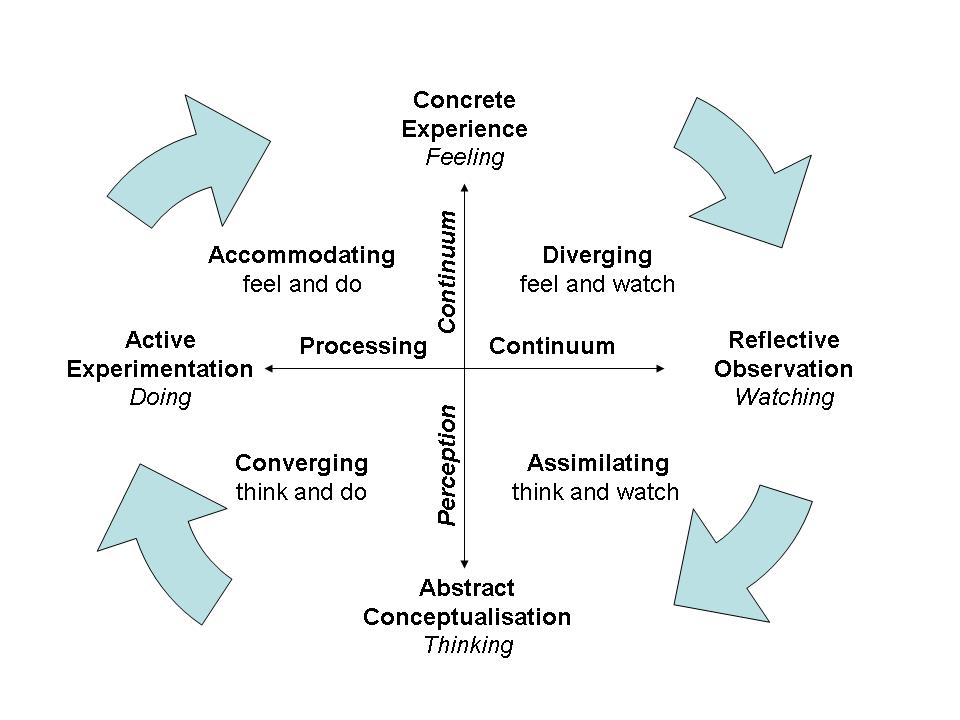
I decided I had to have would be quite partial to a great denim skirt, something that I could wear to death, boots and tights in winter, sneakers and ballet flats in summer.  So I ordered some 8oz Washed Denim Dark Blue and gold denim topstitching thread from Minerva Crafts (which btw, I love, they are my go-to fabric shop atm) and then started thinking.  You might have realised this by now dear reader I’m very much a procrastinator and like to ponder and think about things before I try them out (we were learning about different Learning Styles in college and discussing Kolbs Learning Model and I’m most defiantly a Reflective learner rather than a Active learner, the very thought of jumping in and trying something brand new without thinking and researching makes me break out into a cold sweat!).  So I looked in books, I emailed Kathryn, I drew pictures and made notes and thought about it for a while.  My original plan was to use the skirt block I made a couple of years ago from Cal Patch’s Design-It-Yourself Clothes book so I got that out and looked at the styles she described as I remembered she had a felled seamed skirt in there and realised I could use the skirt section from the Cambie Pattern as it had the basic shape I was looking for, it had pockets, even if they are straight slash pockets rather than the scoop-style pocket I was envisioning, I thought it would save a LOT of time.  

One change I did make was to use lining fabric for the pocket bag, this meant cutting the pocket piece to have a 2” facing which then attached to the lining and was invisible from the outside. I also made the pocket 2.5” larger by cutting through the fold line and extending by measuring my hand on paper. 

WP_20130623_035

I used the pattern waistband except I cut it so that it was in three pieces and I could adjust the fit at the side seams (in the end I don’t think I did adjust it much).  I used some fabric that’s been in my stash for a long time left over from another project for the waistband lining and interfaced it. 

WP_20130623_032


I sewed 2 lines of topstitching on the pocket edge to finish them off as well as giving them strength.

WP_20130623_018

Instead of cutting the front of the skirt on the fold I cut two pieces so I could do a flat-felled seam using the gold topstitching thread and denim needle. 

WP_20130623_017

I sewed the side seams and the pockets together using regular thread and then serged the edges to stop fraying. 

WP_20130623_033

I attached the waistband and then thought some more about the centre back seam.  I wanted a flat felled seam look with a zip inserted into the seam, originally I wanted a lapped zip but despite searching the WHOLE internet I couldn’t find any examples.  Kathryn was kind enough to send me a photo of the back of her skirt which was really helpful.  I then experimented with some scraps of denim and the zip to see how I could put the zip in, top stitch it and make it look like a felled seam. 

WP_002349   WP_002356

In the end I sewed the seam with a regular seam using regular thread, basting the top zip section.  I then pressed the seam open, trimmed the seam allowance down and folded over to make a faux-felled seam this meant cutting into the seam allowance just below the zip.   I unpicked the basted section and adjusted the seam allowance to make a small lapped section.  I topstitched the right line of thread first running all the way from the waist down to the hem on the left hand skirt piece, then I attached the zip to the right hand side. 

WP_002366

Here you can see the zip pinned in place and the first line of the faux felled seam sewn.  The zip was sewn in place on the right using regular thread and then the second line of topstitching was sewn to sew the zip in place and complete the faux felled seam. 

WP_20130623_019

I’m really quite pleased with the way it came out, I wouldn’t mind if the zip was lapped a little more but on the machine I was using that wasn’t  much leeway as I would have liked with the zipper foot I had.  My other machine has a better zipper foot so that might work better in future. 

WP_20130623_040

Inside view of the zip where you can see how I trimmed the seam allowance to allow a faux felled seam and zip insertion!

WP_20130623_025

Here the completed zip + faux-felled centre back seam.

Once the zip was done the rest was easy! I used my chalk hem marker to mark the hem, basted that line, pressed it up to double check and then did a simple hem topstitched about 3/8” from the hem edge. 

WP_20130623_013

I stumbled upon this You tube video in my many hours of research on sewing hems and liked the tip mentioned at 4:08 about hemming over the felled seam and how to use something to support the foot over the contours.  I didn’t have a nice tool so I improvised and used my point turner to prop the foot up and as you can see above it worked pretty nicely. 

WP_20130623_004

I hand-sewed the waistband down using a cross between blind hem stitch (I only took a couple of threads of the denim) and a ladder stitch (I sewed along the fold of the red lining fabric to pop out further along), I’m not sure what the technical name of the stitch is but it works and is invisible both sides!

WP_20130623_031

I overlapped the waistband and sewed on a hook and catch thingy, I actually sewed this on 3 times as the first time it was the wrong way round and the second time there wasn’t enough tension between the two parts and it kept falling open!

WP_20130623_045

Bad hand stitching but at least I matched the thread!


WP_20130623_038

Inside views

WP_20130623_026


WP_20130623_053

bum shot!

I really enjoyed making this skirt, it was a real challenge and a personal design, I decided what I wanted and did it without worrying about going off-piste with the pattern, directions etc.  At the end of the day its just a denim skirt but I feel its a well-executed denim skirt, which went together really well, I only unpicked 1 line of top-stitching and that was because it was too narrow rather than wonky! Just as well really as there's not a lot left, tip #562 buy 2 reels of topstitching thread if you feel it might not go well, there's not a lot of thread on them!  The only other complication I had was that I kept changing thread and the stitch settings from regular to topstitch all the time depending on which seam I was sewing.  As I mentioned I have 2 machines so in future I would thread them both one with regular and one with top stitch and switch back and forth.  Did I say ‘In Future’?  Yes I’m already thinking I want a khaki twill safari kinda skirt next, maybe not with the Cambie pattern though, I might go back to my drafted less-A-Line-than–a-Cambie-A-Line pattern and adjust from there.  First of all I need to source some khaki twill, 10 points if anyone can suggest a good place to get some….

Sunday, 17 April 2011

Where’s the bandwagon?

Yes I am still here, never being the most regular blogger I seem to have turned into an occasional blogger these days.  I still read everyone else’s blogs avidly and in doing so have seen all the wonderful Pendrell Blouses around blogland.  I stumbled across Tasia of Sewholic Patterns just as she was finishing her Pendrell Blouse Sewalong and then loads of versions popped up on various blogs each one looking as lovely as the last and making me itch to make one myself especially as I’m her target audience being very pear shaped!  So when she released her latest pattern (Crescent Skirt) and was offering free shipping (from Canada fgs, I can’t get free delivery from Tesco round the corner never mind Canada!) on both patterns I thought it sounded a great deal (ever the MSEer!). 

Tasia is starting a Sewalong on Monday for the Crescent Skirt which I intend to join in with BUT I’m away for the Easter weekend so I might dip in and out of it.  But in the meantime I HAD to make a Pendrell and as part of my on-going attempt to transform from Slummy to Yummy I thought it would be perfect.  I knew I wanted a white top, to be able to wear with a multitude of patterned skirts I’ve previously made so I found a white cotton lawn (I think) with dobby dots and little squares.  Its a little sheer but not too immodest!  I didn’t want my first (I’m sure there will be more of them….) version to be slippery fabric so I went for the cotton and it was really easy to make.  The only problems I encountered were of my own making

  • I need to use a finer needle for fine fabrics as I had a problem with skipped stitches especially sewing through the various layers when sewing on bias binding trim.  I used a new needle and I re-threaded many times but I kept having the same problem therefore I deduce the problem must be the wrong size needle.  I don’t usually sew with finer dressmaking fabrics so I need to invest in better needles.  I found this a problem in the past having used cheaper Hemline needles, and then swopping for better quality John James needles.  I should have used a size 9/70 I guess..
  • The pattern is a little too long for my tastes, I don’t wear tops tucked in so the natural length is too long for me.  I was too unsure about cutting the pattern before hand (I have enough trauma cutting the paper pattern as it is, what if I’ve got the wrong size?  What if I cut the wrong line?! Can’t get a refund on a cut pattern!) so I ended up cutting off about 4 inches after construction.  I shall go back now and amend the paper patterns to take this into consideration as I can’t every see myself wanting to wear it longer. 
  • I measured myself and 3 out of  4 measurements ended up in the size 14 columns so I traced that size off on Frost Fleece.  Using the Fit For Real People method I tissue fitted the pattern but felt that it wasn’t quite generous enough across the bust and hip even though they were the measurements that hit that size!  I went for the Size 16 (and cut the paper pattern!) but I still have the Frost Fleece if I decide to go a little smaller.  I think the 16 is a good fit but maybe a smidgeon big around the neck.  I might try a 14 in a Frost Fleece muslin to double check the size. 
  • Maybe because I used the 16 I found the armholes a little gappy so I sewed the side seam about 1/2 inch smaller and tapered back to the side seam, this seemed to work well. 
  • I had to sew first and then overlock later as I’m always afraid to commit to doing it in one pass on my overlocker which made the process a little longer.  Having done one version I think next time I’ll do it in one go, that might reduce the amount of skipped stiches as well as the overlocker doesn’t stop for anyone!

Anyway so late last night I finished it!  As it was such a lovely day today I decided to wear it on our family visit to Fishbourne Roman Place near Chichester along with my previous latest creation which I never got round to blogging!  Back in February I bought some Echino Bonbon in brown which I think made a lovely skirt but none of my family seem to agree!!! What do you think?!

WP_000420_Small

I was wearing jeans when I tried it on yesterday but when I put it on this morning I had a bit of a crisis of confidence as I looked different and the ruffles looked waaay too OTT for me but looking at this picture I think it looks ok.  I would like to make a turquoise version to match the turquoise circles in this skirt but then I would only be able to wear it with this skirt or jean?  I would also like to try a shiny fabric but defiantly need good needles for that one!

I’ve got all my supplies for the Crescent, even though it took ages to find a fabric I liked so that's the next bandwagon to jump onto, at this rate I’ll be on to the Colette Patterns next as they are other company that everyone in blogland raves about atm.  Crepe maybe? Or probably Beignet?!

So anyway after irregular blogging I’ve made up for it in this post a very wordy one which can be summarised thus

  1. I made a Pendrell because everyone else was
  2. I will most likely make another one or two
  3. I’m going to make a Crescent Skirt in the Sewalong
  4. I’m easily swayed to follow a sewing blogging meme!
  5. I’m a crap Blogger!

Sunday, 24 October 2010

Pink and Purple Delight!

I fancied a nice autumn/winter skirt in corduroy so I trotted off to the fabric shop the other day and bought myself a couple of metres of rich purple corduroy. 


Using my tried-and-tested-self-drafted-a-line-skirt-pattern I made my skirt.  This was a lot more exciting than it sounds, mainly because I got to use my new overlocker and finish off the seams neatly!  Ok so its a simple skirt and there are only 2 seams but work with me here, I was excited!!  First garment I've made with overlocked (is that a word?!) seams after a few goes playing with it!  It's ever so lovely! 

So I had envisaged doing some reverse applique on this skirt, I didn't have an exact idea in my mind, maybe some sort of leaf pattern on the bottom.  I started sketching out a few ideas and decided to go for a kinda-circular-leaf-sunflower-affair.  I trawled through the scrap bag to find something suitable until I came across a pink knit dress that used to belong to Miss M.  I had put it in the scrap bag intending to copy it to make her a new larger one as she had outgrown it and despite Miss C getting all the cast offs she didn't need another dress.  Now this dress has been in the 'to-do' pile for about 9 months so I got realistic and decided that my need was greater than hers attacked it with the rotary cutter!  There are loads of different tutorials and posts about how to do reverse-applique and I guess there isn't a right or wrong way, as each project is different, but basically I followed Lil Blue Boos instructions.  The most nerve-wracking part was cutting the corduroy fabric as there's no going back once you've done that, I was afraid I would cut through to the pink knit underneath but I managed it (all the way through that stage I kept singing First Cut Is The Deepest)! 


So now I just added a bit of pink bias binding to finish the waist and hemmed it and done.  I know its not the most exciting or original skirt in the world but I love it as it was all my idea although I was probably channelling Boden when I thought of it!  So what do you think?  Funky, smiley, friendly, comfortable, unique and fun are my thoughts!


I shall be linking up with all these lovely link parties this week


Making


The Girl Creative


BWS tips button

Show and Tell Green


Roots And Wings Co


make it wear it

giveaways

monogram


signature


P.S. It also means I can strike another thing off my to-do list in the sidebar!  Result!

Sunday, 8 August 2010

Skirts

Using my tried and trusted self-drafted a-line skirt pattern I made myself a new skirt the other day.  I got some black linen/polyester blend and made my usual skirt with french seams, concealed zip and blind hem. 


I also used bias binding on the waistband, previously when I've done this I've just sewn the binding on but this time I used the crease and stiched in the ditch on the other side. 


I think I've done quite a good job

I also went back to the first skirt I drafted where I had made a very basic waistband and sewn onto the skirt.  Unfortunately this made for a very unflattering and uncomfortable waistband so I took it off and replaced it with bias binding instead.  It makes a much neater, more comfortable and pleasing waistband. 


signature

Monday, 15 March 2010

Is it Amycal or Calamy?

(Please excuse the slippers!)


That's what you get if you cross Amy Butler and Cal Patch. I made this skirt from Amy Butler's Lotus Pink/Tree Peony fabric using a pattern I drafted following Cal Patchs Design it Yourself book. I think it is the best fitted skirt I've had! I have big hips and relatively small waist so I find if I buy a ready made skirt that fits my hips I had a gape at the small of my back so drafting my own means it fits like a glove. I made a voile from some cheap old fabric to test the pattern and had to take the waist in even from my measurements so it definitely pays to check the pattern. On this skirt I used french seams and a concealed zip, I also added a straight waistband but due to my small waist I need to use a curved waistband, I was just too impatient to draft it! Next one I'll draft it and get it right. The concealed zip was more successful than my first attempt but there is still room for improvement. Its looking more and more like spring around here so time for skirts and legs soon, even got my legs waxed the other day in preparation! Now I have a spring skirt there nothing stopping spring from really arriving!

I've had a blog makeover, whatcha think? Not sure about the flower yet so might change again but its a bit cuter!


BTW - I think it should be a Calamy skirt, think that's what I'll call it now!