Monday, 25 July 2011

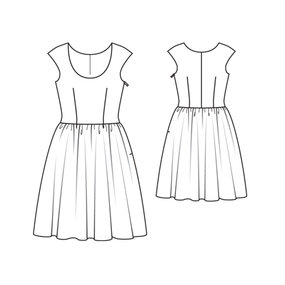
Burda 101

So after fitting the bodice of Burda 101 I finished the dress. 
DSCN8147
I lined the bodice with white cotton lawn, the skirt is a simple gathered rectangle but I treated that as underlining rather than lining so the lining is sewn into the seams and hemmed rather than hang separately.  It was quite tricky to keep the lining and fashion fabric together even though it was basted in before sewing but the viscose fashion fabric is quite mobile so stretching is a bit of a problem.  I decided on the hem length and finished the hem before it was sewn to the bodice, its probably not the most professional way of doing it but I wouldn’t  have been able to do it in any better way.  I also added in a in-seam pocket which is the first time I’ve done one.  I used Lorraine’s tutorial as a guide, seriously if you want to know ANYTHING about pockets this is the place to go I didn’t realise there were so many different types of pocket in the world!  The pocket come out great apart from being slightly too small in the opening, when I drew around my hand I should have been more generous at the wrist area, the pocket is still functional but it would be better to be a little wider.  
DSCN8146
(excuse the odd facial expression – need lessons on better photo expressions!)
DSCN8153
After making this version I saw Katherine's version of the same dress except she put a circle skirt on the bottom and I think it looks much better for the reasons she stated ‘I had less bulk at the waist and more fullness at the hem.’  I felt like it was more a twirly dress than the fabric allowed and a little too bulky at the waist, so next time I make this (as I’m sure I will) I will try a circle or half circle skirt. 
DSCN8162
DSCN8149
(We’re all dressed up for my In-Laws Ruby Wedding Party, Miss M is wearing a dress I made for her last summer so there were 3 Me-Made dresses at this party!)
This was the party I made a dress for my Mother-In-Law for.  I was supposed to travel to their house (200+ miles) late on Friday night which would give me the Saturday morning to make some alterations if necessary but Miss C came down with a 24 hour bug, she had a headache all day Friday and then about an hour before we were due to leave she came down with a temperature of 101oC and had that glazed over look ill kids get.  Off she went to bed about 6.30 and I sat with her until she went to sleep but then she woke every hour for most of the evening.  I decided to give her some paracetamol to bring the temperature down (I’m never convinced whether to or not as you have a temperature to kill the virus/bacteria that has invaded you and taking paracatmol etc will bring that down and does that prolong the fight?!) and 10 minutes later she was sick so that didn’t help her all!  She was half awake and half asleep and almost hallucinating or talking in her sleep with lots of gibberish coming out!  Anyway Saturday morning she woke up and was loads better and after eating she was fine!  Its amazing how quickly children go downhill and then how quickly they come back up as you can see from her expression above 24 hours later!  So we went to my In-Laws Saturday and got there Saturday afternoon, therefore there wasn’t any opportunity to make any adjustments but if I had time, I would have tweaked the bodice a little:-
  • Take the back neckline in a little as there was a bit of gaping across the shoulders.
  • The front armscye needed a little trimming
  • The bodice could do with being a tiny bit more generous as its a little tight on her ribcage so the seams could be let out a little. 
DSCN8161
(I managed to get the crease out of the skirt front after following Rufus & Rachels advice)
DSCN8158
Everyone was very complementary about her dress both to her and to myself and I was relieved it fitted as well as it did.  I can still see what needs correcting but that's the problem with sewing your own clothes you just see the mistakes!    I think it looks good and I learnt a lot by fitting a dress on someone else's body, adapting those changes back to the pattern, using a fragile fabric as this silk frayed badly so it was all a success! 

Thursday, 21 July 2011

Little Girls Winter Clothing

Yes yes I know its summer but unfortunately the weather in the UK doesn’t agree with me!  I was browsing in the fabric shop the other day (I only bought thread but I looked at EVERYTHING) and found some great needle cord that would look fabulous on my girls.  Its ages since I’ve made any clothes for Miss M & Miss C so I thought they would be perfect for autumn /winter clothes but then I was stuck. All the patterns/designs I see for kids are pretty summer dresses but I want pretty-but-functional autumn/winter dresses.  Only thing I can think of is a pinafore/jumper that can be layered with long-sleeved t-shirts and tights/leggings but there must be other possibilities. 

What have you seen around?  And who are good designers for kids (9 & 6) the Big 4 seem to be stuck in the 80’s and the summer so where should I be looking?  Help gratefully received!

Saturday, 16 July 2011

BurdaStyle 101

I’ve been fancying a couple of patterns on BurdaStyle specifically #101 and #104 but I decided to go for #101 as I intend to wear it to my in-laws 40th wedding anniversary party and I didn’t want it to look too similar to the silk dress I made for my MIL.  So I downloaded the pattern, although I didn’t realise it was just for the bodice and not the skirt.  Not that its too much of a issue as the skirt is just a gathered rectangle so it doesn’t exactly need a pattern. 

The largest size was just a little bit too small for me judging by the measurements so I traced it off and then added on a 1 inch seam allowance to accommodate the extra me!  I added this seam allowance on all pattern edges but it should have just been the side seams.  I made a muslin and then had a play with pins!

Here are some really bad photos please ignore any domestic chaos in the backgrounds…

DSCN8058

I let the side seams out slightly and played around with the darts quite a lot but ended up pretty much with the original darts just lowering the bust point a couple of inches to avoid the Madonna-Conical-Bra-look.  I needed to take the width across the chest in a little which you see with this tuck I’ve put in.  I had to do the same thing when I was fitting a muslin on  my MIL, I’m not sure what that indicates, is that the size is too large for the chest and that I should take a smaller size and then do a FBA?  Anyway to convert this back to a paper pattern I retraced the pattern and angled the edge of the first version so that a small amount was right of the edge of the paper (centre front fold) at the top and the rest was added in at the lower level by angling to the left.  I then smoothed out the neck curve so that it was horizontal at centre front.   (Does that make any sense and is it at all correct?!  It was more intuitive than based on experience or fact!)

DSCN8056

Here’s the original back, although the pattern said to have a centre back seam I decided I knew better and I would cut it on the fold.  This was a bad decision for a number reasons

  1. It increased the yardage of fabric as both bodice pieces would need to be cut on the fold rather than next to each other. 
  2. I reduced the number of possibilities to tweak the fit!

As you can see there is some bagging and puffiness to the back especially at the neckline.   Also remember this version has a 1” seam allowance all around including the neckline so that could have accounted for some of the flappiness there. 

So I traced the pattern again reflecting the changes I’d come up with so far

  • putting back the centre back seam
  • using a 5/8” seam allowance
  • adding some extra width the the bodice
  • marking the sewing line and clipping the curves

DSCN8065 

The front…..

DSCN8075

… and the back.  I’ve put the centre back seam in and I tried pinning a wedge at the neckline but there was still a lot of bagginess in the back.  So I took the back seam in about 1/4” all the way down. 

DSCN8082

At the moment this is just pinned so there are a number of creases and unevenness across the back but its miles better than before.  It doesn’t show up well on the pictures but there was also a puffiness on the shoulder blades.  I decided to trim the neck edge of the shoulder seam just a slither to pull it a little tighter as it was a little too high above the shoulder which then travelled down to the shoulder blade to give the puffiness.  Again it was intuitive as to the changes to make, not sure if they are correct or not!  It certainly looks better to my eyes. 

DSCN8087

Here's the final front.  I’m quite pleased with it now. 

I’m making it out of a viscose print which perfectly matches the colour of my raspberry sandals!  Its quite sheer so I’m going to line with with a white cotton lawn (which cost more than the viscose!).  I spent ages in the fabric shop today comparing different fabrics for their coverage and how they changed the flow and feel of the viscose.  There was a lovely brushed cotton/flannel that would feel cosy against the skin but as this is a summer dress I went for the cool crisp lawn instead.  

DSCN8062

Both fabrics have been washed and ironed and are now ready for cutting!  I’m going to use the lawn as a separate lining for the bodice but for the skirt I thought I would treat it more as underlining and sew it into the sides seam as one piece of fabric and at the hem.  I want to do this as I don’t like the feel of a lining skirt separate to the outer skirt, reminds me too much of  petticoats/slips that my mother made me wear as a kid!  Also I can’t get my head round how to insert an invisible zip in 2 layers of skirt and I might even add an in-seam pocket as well!

My intention is to get a good well fitted basic bodice which I can then play around with and change the necklines and even progress onto sleeves!  Watch this space…. 

Friday, 15 July 2011

Simplicity 5961–Finished!!

So I finished the dress for my MIL!

DSCN8042

What do you think?  I’m really pleased with the construction as it probably the best finish I’ve done so far. 

DSCN8047

All the seams are either overlocked or bound inside bias binding so there are no raw edges.  I did consider lining the dress but as its dupioni silk it doesn’t need it from a see through point of view and I think the stiffness of the fabric works well with the pattern and lining might alter the flow of the garment. 


DSCN8050

I tacked the underarm seam allowance to the bias binding to hold it in place, I’ve still to tack the bodice/skirt seam to the darts and I want to put a hook and eye on the zip just in case. 

WP_000713

My only problem is that I can’t press out that crease down centre front of the skirt.  I daren’t use a hot iron and I can’t use steam or water to help it away so what would you recommend?  When I’ve been pressing I’ve been using a muslin pressing cloth (go on then actually its a clean tea towel!  Must start a collection of pressing cloths…) on the right side and straight onto the fabric on the reverse but I’ve only been using a warm iron.  Its been enough to get rid of lumps and bumps in the fabric but that crease is still there, actually it looks worse in that photo than it does in real life but it still bugs me so any advice gratefully received as ever. 

The 40th wedding anniversary party is next weekend so I’ll get some photos of MIL wearing the dress (if it fits!) and I’ll post them soon.  Now I have to make  matching tie from the leftover fabric using this tutorial and I’m going to make myself a dress as well!

Wednesday, 13 July 2011

Simplicity 5961–Update

OK, so I fitted the dress on MIL so next thing was to cut the 50 year old silk (yikes!), so I laid all the fabric out and set about laying the pattern pieces…

DSCN8007

… took a deep breath and cut them out!  I didn’t want to use carbon paper or pens/pencils on the silk to transfer the pattern markings in case it permanently marked it so I used tailor tacks. 

DSCN8009

To sew the darts I used this method holding a thread at the dart point  to show a line to follow.  I found it really easy and much more accurate than any other method I’ve used in the past. 

DSCN8025

Here’s the bodice sewn up.  I’ve made a change from the original pattern to replace the armhole facing with bias binding to make what I feel is much neater more professional finish.  I sewed the binding on BEFORE sewing up the side seam.  Once the zip is in place then I’ll do the same on the neckline. 

DSCN8027

Here you can just make out the binding on the bottom left of the picture with the topstitching on the armhole. 

DSCN8037

Here’s the skirt with the side seams and half of the centre back seam prior to invisible zip being inserted.  I’ve finished all the exposed seams using the overlocker and the other seams will be sealed inside the binding, this silk frays like mad so this step is essential.   

Left to do

  • Sew bodice to skirt
  • Finish the bodice/skirt seam edges
  • Insert invisible zip
  • Sew bias binding finish to the neckline
  • Hem skirt with bias binding

Should be ok, I’ve also got to make a matching tie to make for FIL and I did want to make a dress for myself for the party but not sure if I’m going to have time now…… 

Wednesday, 6 July 2011

Muslin Fitting

So I mentioned I was making a dress for my Mother In Law for her 40th wedding anniversary party, using Dupioni Silk bought from Singapore when she was a teenager and a vintage pattern she used when she was a teenager.   Add to that the fact that my MIL lives 200 miles away and I won’t be able to get the dress to her until the day before the party.  No pressure then!  

So of course the first thing to do was to make a muslin (although I’m British and should say toile, I don’t like that word and can’t say it so I say muslin, so sue me!) so I bought the ubiquitous calico fabric and set about making the muslin.  The pattern was a size 16 which was the size my MIL was using in the late 60s.  I basted the seams and sewed the sewing line on the neckline and armhole. 

DSCN7852

I took the whole process very slowly, sewing one or two seams at a time and then leaving it alone.  Eventually I ended up with a dress!

DSCN7961

DSCN7963

I inserted the invisible zip using this tutorial which tells you to sew the seam before inserting the zip, which is different to all the other instructions but its a much better finish, there isn’t that bump at the join between the zip and the rest of the seam.  I shall definitely be doing this in future. 

My MIL came for a fitting last week, now its 40+ years since she last made and wore this pattern and after that time and 3 kids I expected to have to make a few adjustments, the least of all being to move the dart positions and possibly having to adjust the waistline.  So you can imagine my surprise when she put it on, it was like a sack of potatoes on her!  She’s smaller now than when she was a teenager! 

DSCN7968

How unattractive is that?!

DSCN7969

The back isn’t much better!

So I set about her with some pins and ended up with something much better……

DSCN7978

I didn’t need to adjust the bust darts at all.

DSCN7980

The sides where taken in about 1.5 inches each side

DSCN7981

The neckline was a bit too gappy for my liking so I pinned a dart in there to take in the excess. 

DSCN7975

I’m particularly pleased with the back where I added 2 darts to the skirt to take in some extra puffiness. 


So overall I really pleased with the changes I made and more importantly so was my MIL.  Its so much easier to fit a dress on someone else rather than yourself!

In summary:

  • I took a good 5 inches off the length as MIL is not so tall and loads off the side seams. 
  • I’ve made a note to sew the back left dart a little deeper as there's still a little loose fabric there. 
  • I shaved a little off the back armscye as it was a little too tight so it was worthwhile sewing along the sewing line on the armscye as it showed this very easily. 
  • I added a centre front dart to remove bagginess. 

I’ve transferred these changes to a paper version taking care to line up the new back skirt dart with the existing back bodice darts.  I was very pleased when 2 independent measurements matched up and I’ve pinned the paper pieces together and everything seems to match ok. 

Now comes the nerve wracking part where I have to cut the silk!  I won’t tell you about being awake at 3am this morning worrying about it, I’ll just tell you that I’m going to go for it and take as much care as possible and cross my fingers!!!!  Wish me luck!

Tuesday, 5 July 2011

Bias Binding vs. Facing

Just a very quick question that I need some help with. 

I’m making a dress for my Mother In Law who visited the other day for a fitting.  The dress is Simplicity 5961 and we are making View 3 so no embellishments and it is being made out of vintage dupioni ruby silk.  She came for a fitting last week and I’ve made a number of adjustments that I will blog about soon, I was talking to friends mum who has years of experience about the dress and she recommended instead of hemming the dress I used bias binding as it would be cleaner and less bulky, I’m completely on board with that and I’ve adjust the hem length to take that into consideration.  I’ve made a slight adjustment to the bodice neckline as there was a bit of gaping on the muslin/toile so I pinned it into a dart.  I wasn’t sure how to reflect that change onto the paper pattern but my friends mum suggested just shifting the pattern off the edge of the fabric fold to make that adjustment.  I’ve tried it in principle and I feel that's correct but does anyone have a different view? 

Also because there is this tiny adjustment to the neckline it means I’ll have to do the same with the facing but it got me thinking (whilst in Zumba class of all places!) couldn’t I just use bias binding on the neckline as well?  I’m not a huge fan of facings as I feel they cry out home-made whereas a bias binding neckline a la Pendrell seems more of a  RTW technique.  Is there any reason to use a facing over a bias binding finish?

Also can I get bias binding specifically for silk or will regular cotton binding from the haberdashers be ok?  I don’t think I want self fabric BB as that would result in more bulk. 

Thanks for your help and I promise to reward you with a more interesting post soon with pictures of my muslin/toile and the fitting!