Sunday, 31 January 2010

A Yo-Yo dress!

We were getting Miss C dressed yesterday and realised that she's outgrown all her clothes* so I set about making her something new. I took a dress she already had (My Favourite she said) an OshKosh A-line dress, which I got from Ebay a few years ago so I've no idea how long the design has been knocking about for, as a template.


I put it on tracing paper and then copied the style making the size much bigger. I found some lovely pink flowery fabric in my stash that I had bought ages ago.


The design I came up with was a really simple A-line dress with identical front and back with fixed straps, I also made a facing which I lined with fusible interfacing for strength.


This was a learning experience with lots of firsts -
  • using the Hemming Foot on my machine which I've never done before, all I can say is I'm glad my girls were in bed otherwise they would have added some grown-up words to their vocabulary! I'm sure it's not as hard as I found it but it was certainly taxing, I'm sure next time it would be better. The end result was better than I normally achieve for a hem so I'm sure I'll persevere!
  • making a garment from a pattern I've made, never really done that before so was kinda working in the dark. You know how you sometimes don't know enough to know that you are doing something wrong? It was a bit like that!
  • Yo-yo - I thought it needed something to finish it off, and to tell the front from the back, but I wasn't sure what it needed. Cos the fabric has such a small repeating pattern it needed something plain really, ideally pale pink pockets a bit like the original, but I didn't have anything like that in my stash so I debated between some sort of ruffle and yo-yos. Yo-yos are not something I'm particularly familiar with, don't think they are a very UK thing. I certainly don't think I've ever seen one in the flesh before but I thought nothing ventured etc etc (back to the thing about not knowing you can't do something!). I used Heather Bailey tutorial although once you've made one they are a piece of cake! I made 3 yo-yos (no3 was definitely the best!) and then spent ages trying to decide where to put them, group of three, triangle, line and where to position them. Eventually OH got bored and told me what to do made an executive decision for me and I put them in a line across the chest. The observant among you will have noticed that the picture at the top is missing said yo-yos, I decided the dress needed a little something after the photo shoot!


Things I've learnt:-
  1. I can make clothes from a pattern I've made up, it's not as hard as I think it is
  2. Yo-yos are great and you can even make heart shaped ones, square ones, ovals, large ones, small ones...... Look out for lots of yo-yos on my garments in future! And hair clips, and bags...... (Wanders off looking for boring things that need jazzing up with yo-yos! Might even graduate to Kanzashi Flowers!)
  3. Sew the facing onto the front and back of the dress before you sew the side seams together. My problem is I'm too eager to see something take shape!
  4. Sew the straps on with the facing a bit like a bag rather than leave that as the last step and realise it should have been the first step! That's why I ended up with uglyish crosses holding the straps on, thought it would make the best of a bad lot by doing that, certainly doesn't need a cross for strength!
So Miss C's first homemade dress, I'm guessing it might be the first of many, so many variations on the pattern are possible; buttons on straps, applique designs, pockets, mixture of fabrics as per the original.... the world is my oyster! Trouble is Miss M wants something as well and I don't think the style would suit a 7 year old so I'll have to look around for some inspiration. The thing is though I don't like paying for patterns as it make it so expensive when you've added in the fabric and factored in the time, still handmade things are made with love rather than economy!

* Actually they are Miss M's clothes! There are advantages to having 2 girls who's birthdays are only 2 weeks apart I have all the right clothes for the right season in the right colours!

Saturday, 23 January 2010

Cross Stitch Baby Sampler - Detail Added

I've pulled my finger out and spent a bit more time on my Cross Stitch recently. I finished the colourwork and started adding the detail using backstitch. I don't like doing backstitch (does anyone?!), I find that I can't see the bigger picture and think it looks rubbish as you are focusing on one small area, so it wasn't until I took this photo that I thought it looked ok! Still a bit more to do on the detail and then put the name and birth details on but feeling a lot better about it now than I was! Still got 3 weeks before the babies christening so I should be ok, famous last words!

Hi-Vis Balaclava

I made a balaclava/ski mask for DD1 today.  Miss M is studying polar explorers in school and in a couple of weeks they are having a Polar Exploration Day where they have to design a Survival Kit and spend the day in tents in the school grounds.  She is very much looking forward to it!  So we were in need of a balaclava, one internet search later and I found this helpful tutorial with 3 types of fleece hats. Miss M has a large head for a 7 year old so I made a medium version C.  We bought some fleece from the fabric shop and away we went.


 Printed out the pattern and cut out the correct size, the larger piece needs to be cut on the fold and 4 smaller pieces are needed. 


Fabric cut out ready to go (red and green should never be seen!!)


The smaller pieces are sewn together to form the crown of the hat, here are 2 of the pieces together. 


And the finished article!


Miss M had a ponytail in the back of her hair so you can see a lump at the back of her head, on Polar Explorer day I shall have to remember to do her hair differently!


As this was just for a school project and probably never worn again * I didn't take too much time or care with it, ideally the edges round the face should have a binding as it would probably stretch over time after being pulled on and off repeatedly.  I also sewed the fabric with a small seam allowance which isn't factored into the pattern as the original design called for flat seams. 

Red is Miss M's favourite colour at the moment but I think it would be beneficial in Antartica as its soo bright you could probably see her from the Arctic!
I still have loads fo red fleece left so I might make some mittens....

* We live on the South Coast so not much call for balaclavas although I would have been grateful for it a couple of weeks ago in the snow!

Tuesday, 12 January 2010

Michelle Skirt Finished!!!!!!

Whoohoo, I've finished it!


I got a zip yesterday and got stuck in, its only the second zip I've sewn and I forgot what I learned the first time so I had to unpick the zip and do it a second time but I learn something new each time.  At least thats the plan!

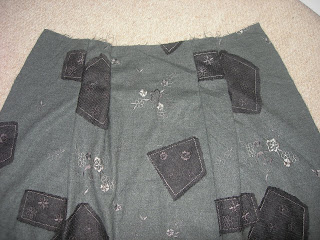
The skirt has a facing on the waist rather than a waistband as you can see. 


This is actually a quite simple pattern to use but as you can see I've made some changes in that I didn't add the contrasting ribbon/trim at the top or the contrasting panel at the bottom.  This is mainly because this fabric doesn't lend itself to a trim having its own pattern but also because I have a bit of a tum and I'm not sure that the ribbon would be flattering to me!  I think I'll make this skirt again (although I need a smaller size whoppee) and I might chose a plain fabric that can have a contrasting trim. 


This means I've completed Carolyns first challenge to sew something for myself!!!!  I wore the skirt today and got some compliments but even more when I told them I had made it myself so I'm quite chuffed at that!  Nothing can stop me now!  The next item of clothing I fancy making for myself is a Boden-like Fun skirt but I need to find myself a good pattern.  Might browse the free patterns on Burda Style again........


Sunday, 10 January 2010

A Rainbow Roll

So excited I've got something to show you!  I've been wanting to make a pencil roll for my girls for ages and this morning I thought I would do it!  And I did! 


Its based very heavily on Cassie's brilliant Tutorial from You Go Girl, the only difference is I didn't bind the edges but sandwiched the layers together I also added a pencil sharpener as there's nothing worse than blunt pencils when you have a masterpiece to finish. 


I pinned the right sides together and then stitched round leaving a gap to turn the piece through. 


The corners were trimmed before turning and then poked with a sharp stick to make the corners sharp. 


A close up of the vintage buttons used that we found in my collection I inherited from my mothers stash. 


I often get these desires to make things I've seen and usually I assume that I haven't got the fabric but having sorted out my fabric stash I realised I have more than I thought so this morning instead of procrastinating I got on with it, which I'm going to make my motto for 2010!  And I know what you are going to say I should be finishing my WIP projects but but but I need a zip for my skirt and the weather has been too horrible to go to town to get a zip!  Anyway thats my excuse and I'm sticking to it!  Theres been a bit of a thaw so maybe I'll get down there tomorrow...

Friday, 8 January 2010

Michelle Skirt WIP - Sewing Pleats

Right I started sewing my skirt which has 2 pleats front and back. When I had cut the material out I had use carbon paper to transfer the pattern markings on to the fabric but when I took the paper pattern off the paper I found that the marking hadn't come out very well so I had to do them again.  The paper I'm using used to be my mothers and is older than I am so maybe I should invest in some more!  Once I had my head around how the pleats worked (even though I've used this pattern before, I had to get the other skirt out to remind myself!) I was away and stitching!


Once I'd sewn the pleats they were pressed to make them a bit neater. 


Next step soon........

Wednesday, 6 January 2010

Cross Stitch Baby Sampler Progress

I've managed to spend a few hours on the Baby Sampler the last few days and made a bit of progress......


still lots of detail to add but at least I'm making progress!

Michelle Skirt WIP - Cutting Out

Now I have my cutting mat and rotary cutter theres nothing to stop me!  The material I'm using is a sort of flannel patchwork.  It feel really soft and I'm looking forward to wearing it!


So I found the pattern, laid it out and started cutting.   I used my brand new rotary cutter for the first time and its really good, nice clean cuts without any problem.  Its wickedly sharp though, must be careful with it!


Now to start sewing!

Cutting Mat & Rotary Cutter

My Christmas present arrived yesterday!


  I got myself a cutting mat, ruler and rotary cutter, these were bought from Cotton Patch and the nice UPS man delivered it yesterday (just before the snow arrived!).  I've never used a rotary cutter before and I've warned my girls that under no circumstances are they to touch it!  I bought a starter pack which is a 24" by 36" mat with a ruler and clover rotary cutter.


  I also bought the Olfa one as I wanted to have the wave and pinking blades but I haven't ordered them yet!


Sunday, 3 January 2010

Cross Stitch Baby Sampler - WIP

I'm making a baby sampler for a friend who's baby was born in August.  She doesn't know I'm making it!  Its supposed to look like this......


but currently looks like this.......
 

so I have a far way to go!  I've found this one quite tricky as its gradual colour changes rather than definate changes like the cartoony images I've sewn previously.  This means that there was little stitches here there and everywhere.  I guess theres a learning curve to each project, otherwise whats the point!  I'm hoping to get this finished for mid Februrary as a gift for the Christening, wish me luck!

Friday, 1 January 2010

My Favorite January Challenge

In case you've missed it Carolyn at My Favorite has set up her January Challenge to make something for myself. I've been planning to make myself a winter skirt for ages but you know how things are, Christmas arrived, my kids have their birthdays in December etc etc etc! I bought the material ages ago and I'm going to use a pattern I've already used and made a summer skirt. I've just ordered myself a rotary cutter and cutting mat with some Christmas money I had so I'm waiting a few more days for that to arrive and I'll be away! Can't wait!!!!!!!!